Three Simple AC Maintenance Items

According to most air conditioner experts, there are three basic maintenance items for AC units that people overlook. And these three items comprise a large portion of easily preventable equipment failures. These consist of the condensate line, the air filter, and the condensing coil.

The Condensate Line

In Texas, most single-family homes with AC have what’s called a split system. This consists of a big box that sits on top of the furnace called an evaporator coil, which is connected to another box at the exterior that contains the compressor and condensing coil. If you’re curious about how this system works, head to HowStuffWorks; they have some nice descriptions and illustrations.

An air conditioner ‘conditions’ the air by removing heat and moisture. As warm, moist air gets passed over the evaporator coil (the thing that sits above the furnace or air handler), moisture condenses on the cold tubing. This condensate drains down to a pan where it gets directed out.

Condensate needs to be directed to an appropriate location, which is typically a nearby floor drain (i.e. sink or washing machine drain). This drain material must consist of cast iron, galvanized steel, copper, copper alloy, PEX, polyethylene, ABS, CPVC, PVC, or polypropylene pipe or tubing. The drain must also have an internal diameter of at least 3/4″.

When improper materials are used, the drain is undersized, the condensate drain has an increased potential to get blocked up. If the condensate drain consists of a garden hose or clear plastic tubing, replace it. This will help to prevent a blocked condensate drain, which will help prevent unwanted leakage at the evaporator coil.

Make sure your condensate drain is properly installed and properly secured.

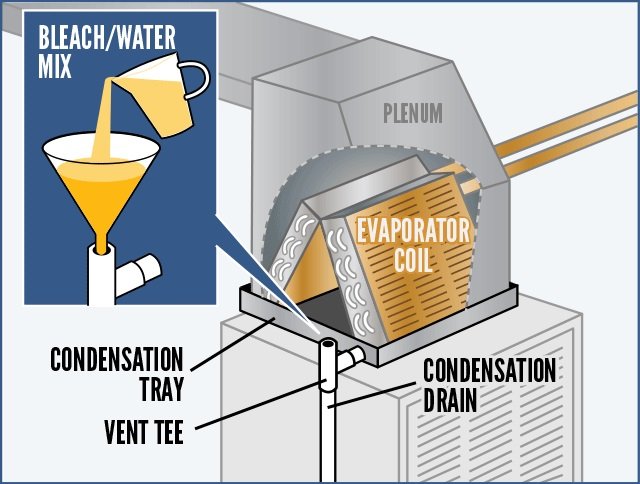
In addition to this, there is a P-Trap in the condensate line typically in the attic near the air handling unit. Once a year you should pour a cup of bleach or vinegar in this to prevent organic growth that may plug your drain line during extended periods when you are not operating your AC unit (i.e. winter). I usually add vinegar to my condensate drain line vent over the Thanksgiving break each year. I prefer vinegar as it is more environmentally friendly than bleach.

The Air Filter

The air filter, also known as the furnace filter, must be replaced regularly. Usually, every one to three months will do, depending on the type of filter that’s installed. While most homeowners know about changing the filter during the winter, this still needs to happen during the summer when the AC is running.

If your home has a high-velocity system with an air handler in the attic, the filter will usually be located at the ceiling in an upper-level hallway, bedrooms, or in the attic right before the air handler unit.

Restricted airflow means reduced efficiency and reduced cooling capacity.

The Condensing Coil

This is the one that gets forgotten about the most. The compressor and condensing coil are the parts that sit outside the home, preferably in some out-of-the-way part of the yard. To help dissipate the heat that gets removed from the home, a big fan pulls outdoor air over the condensing coils.

For the condensing coil to work properly, it needs plenty of airflow.  This means no trellis attached to it, no ivy, no plants, no walls, no boxes, and so on. Clearance requirements will vary from manufacturer to manufacturer, but a good general rule is 24″ of clear space. Keep vegetation trimmed away.

Condensing coils also need to be cleaned regularly. If your condensing coil is covered with dirt, dust, grass clippings, dryer lint, cottonwood seeds, and other outdoor stuff, you won’t have good airflow. Take the time to inspect all sides of the unit and clean the coils off if necessary. This can usually be done by spraying the unit down with a garden hose. Don’t try a pressure washer; the fins will bend very easily.

If your unit has protective grills that prevent access to the coils, you’ll need to take the grills off first. At that point, you need to do some dismantling. You might prefer to have an AC technician do the work if that’s the case.

New BOOK NOW Feature Added To Website

Now it is easier than ever to check inspector availability and schedule your home inspection with Texas Valor’s new Book Now feature. Located at the top of each page in the menu section.

Book Now 2.png
Inspector Square.jpg

Your offer just got accepted on the home you want, now what? A home inspection should be at the top of the list of things you need to get done. It's your opportunity during the option period to have a licensed professional home inspector diagnose the health and material condition of a home's mechanical, structural, plumbing, electrical, roof and other components. 

​As the home buyer, you get a chance to select an objective 3rd party to perform your home inspection before you fully commit. The home inspection report Texas Valor Inspection Services produces gives you leverage to work with your Realtor to negotiate/prioritize repairs, request a credit at closing or a reduction in the sales price. Not only do we offer the most professional and best quality inspections in town, we now make it a stress free process with contactless scheduling, report delivery and payment processing.

Let us put our skill and experience to work for you to help protect you as you move forward with what is likely the largest investment you will make in your lifetime.

Please contact Texas Valor Inspection Services to schedule a professional inspection for your home or business: 833-898-2567 or email larry@texavalor.com

Top 10 Water Heater Code Violations

Installing a tank water heater might seem easy, but some of these common mistakes could be life-threatening.

021288018-main-700x394.jpg

In the minds of many, installing a tank water heater is a piece of cake—an “I can’t believe I need a building permit to do this” kind of thing. These are the people who usually fail inspection. Indeed, a water heater can be easy to install, but replacing one in an existing home can introduce a host of complications. Some of this stems from the norms of the American home-building industry. Basements in new homes are usually left unfinished and pitched to buyers as a project they can easily tackle themselves when they need more living space. That day comes, and they go for it— frequently without a permit— unwittingly creating a number of code violations with respect to the water heater. One common mistake: boxing the water heater into a closet to hide it from view of the newly finished space. The deficiencies this creates surface when it comes time to replace the failing water heater and the building inspector shows up to sign off on the new installation. This kind of scenario happens more often than you might think; I see it all the time. There are a lot of code requirements around water heaters and not enough space to get into every one here. What follows are 10 of the most common code violations that I and other code professionals see out in the field when looking at water heaters, particularly replacement water heaters.

021288018.jpg

1. Confusion about pans and drains

Drip pans are required when tank-type water heaters are installed in places where a leak could cause damage. These pans are not meant to protect from a catastrophic tank failure; they’re meant to catch the slow leak that no one notices. In a basement with a concrete floor, damage isn’t generally a concern. When the basement is finished, it may be. Drip pans in new homes also require drains. Neither pans nor pan drains have always been required, and they have been a tricky issue when it comes to replacement water heaters in newly finished spaces. Is there a place to drain to, and a route to get there? Installers and inspectors long bickered over whether either was required in replacement installations where a pan and drain wasn’t previously provided. The 2015 IRC brought some clarity, stating that drains aren’t required when they weren’t previously provided. The pans themselves, however, must be installed if the water heater is located where a leak can cause damage. Prior to this, the top violation would have been not installing pans and drains with replacement water heaters—now, the issue is inspectors continuing to require drains without notice of this code change.

2. Unsupported expansion tanks

Some may tell you that an expansion tank is required at every water heater, but that isn’t in the IRC. Where requirements for expansion tanks show up in local codes, they’ve been added in. What is required is “a means for controlling increased pressure caused by thermal expansion … where required,” and that’s only necessary under certain conditions. Figuring out whether a particular installation meets those conditions can be complicated. The easy solution is to just add an expansion tank—it doesn’t hurt. But because it’s an easy way out, the default position in many locales has become “expansion tanks are required.” The real answer about whether they’re necessary should come from a professional installer, not a regulatory authority. There are other devices and methods for controlling pressure other than expansion tanks. When expansion tanks are included, physical support for them is something of concern, as installers often leave them simply hanging by the pipes they connect to. Read the manufacturer’s installation instructions before you do that. It’s not a good choice, and some local codes prohibit it.

3. Improper TPRV pipe installation

The temperature pressure relief valve (TPRV) is an incredibly important life-safety device on every water heater. Its proper functioning is the difference between a nice hot shower and an explosion. Unlike the expansion tank, which is intended to protect the piping system from pressure, the TPRV protects the water-heater tank from experiencing more pressure than it can handle. Here’s how your water heater becomes a pressure bomb: The boiling point of water that we are familiar with—212°F—is the temperature at which water at sea-level atmospheric pressure turns to vapor and greatly expands. But as pressure increases, so does the boiling point. This means that when pressure builds up inside a water heater, liquid water can get hotter than its atmospheric boiling point, until the tank ruptures. When 40 or more gallons of superheated water is suddenly brought to atmospheric pressure and instantaneously vaporizes, the massive expansion can launch your water heater through your house. The TPRVs themselves are not usually a problem on water-heater installations, as they come installed in the water heater. The problems occur in the pipe between the valve and the discharge point. The IRC provides a list of 14 specific criteria meant to keep this pipe open. It cannot connect directly to a drain system; must discharge through an air gap in the same room; cannot be smaller than the diameter of the valve it’s connected to; can only serve a single appliance; must discharge to the floor, pan, receptor, or outdoors; must not cause structural damage; must be observable to the occupants; cannot be trapped; must flow by gravity; must terminate within 6 in. of the floor or receptor; cannot be threaded or have any valves or tee fittings; must be made of materials approved for potable water; and must be one size larger and secured at the end when made of plastic tubing materials. Many installations are tripped up by a number of these specific requirements.

4. Unlisted cord and plug

Most items in this list apply to conventional gas water heaters, but electric water heaters are also common. The hazards of gas, venting, and combustion air are eliminated with electric appliances, but there is still one common violation to be found. These appliances are generally intended to be hardwired to a switch location, but installers often buy a generic cord-and-plug assembly and plug them into an available outlet. Electric water heaters can only be installed with a cord and plug where listed by the manufacturer for such installation, and they must use a cord and plug that has been listed for use with the specific make and model of water heater. This rarely happens, which is why I recommend hardwired installations.

021288020.jpg

5. Not enough vent and vent-connector clearance

Conventional tank water heaters generally utilize two types of vent and vent connectors: B-vent and single-wall. These vents get hot by design—a hot vent is part of what produces the draft required to remove the combustion products from the building. But B-vent and single-wall are not the same. B-vent has a pipe inside a pipe with an air space between them that insulates the outer pipe from the hot inner pipe. Because the outer wall of B-vent doesn’t get all that hot, code requires only 1 in. of clearance between it and combustibles. Single-wall vents get very hot, requiring a 6-in. clearance to combustibles. In an attempt to maximize finished floor space when boxing off the water heater from the rest of the room, people often don’t leave enough clearance between the new wall framing and the vent pipes. Basement-finishing projects are notorious for this code violation.

6. Insufficient vent and vent-connector slope

The ideal vent or chimney system is entirely vertical, though this is rarely feasible. More often, fuel-fired water heaters connect to a chimney or vent by way of a vent connector, which is essentially just another piece of pipe. The connector should be as short as possible and must slope upward from the water heater at a slope no lower than 1/4-in-12. Once it connects to the vent—the portion that leaves the building—things get more complicated. The general expectation is that the vent run vertically, with offsets no greater than 45° from vertical, but that is not the whole story. Vent-slope limitations hinge on a number of variables, including the diameter of the vent, length of the vent, type of vent, and a host of other things. Once a house is built and the vent system designed, it’s no easy task to evaluate and modify it later. When finishing basements, owners often find the water heater isn’t where they’d like it, so they move it and connect it back to the original vent with a long, low-slope vent connector. Long horizontal vent runs can greatly reduce the drafting ability of natural-draft appliances, and could lead to backdrafting of combustion gases into the home, creating a major life-safety hazard.

7. Incorrect draft-hood connection

Water heaters are tested and provided with their specific draft hood (draft diverter), but it doesn’t come attached; it’s in the box separately. The installer must attach the hood that came with the new appliance, and this almost always requires fasteners. Too often I’ve arrived at inspections where the hood from the old water heater is used on the new one. Even more often, the new hood is used but not properly fastened—the provided screws are still in a bag with the instructions, glued to the side of the water heater. This is a very embarrassing reason to fail inspection, so never forget the screws.

8. No support for plastic vents

High-efficiency power-vented water heaters with plastic, sealed vents are popular, especially in new, tight homes, and as replacements for conked-out conventional water heaters. They eliminate the issues with conventional vent clearances and slope, and can also relieve the issues of interior combustion air. The plastic vents can be installed horizontally, but they must be supported according to the manufacturer’s specs. Water vapor produced during combustion will condense inside these vents, so they must be sloped to drain. These horizontal vent pipes are often fished over finished ceilings in a basement and left unsupported. A sag in the vent can allow water to accumulate and affect the safe and efficient operation of the appliance. Though not a joy to anyone, sometimes a finished ceiling needs to be cut to install proper support for the vent.

9. Sediment traps that don’t work

A sediment trap and a drip leg are often considered one in the same, but not by the code. A drip is only required when wet gas (gas with a small amount of liquid present) exists. A drip simply needs to allow gravity to collect the liquid in the low spots. A sediment trap is required when an integral trap is not provided in the appliance, and it usually isn’t. From manufacturing to service, gas pipe goes through quite a bit of handling, cutting, and threading that can leave some debris— usually bits of metal—in the pipe. This debris, or sediment, can be small enough to get caught in the flow of the gas. Unlike a drip leg, gravity alone will not separate the sediment from the gas stream. A sediment trap requires a hard turn that the gas can flow around but sediment can’t—much like a sharp turn in a fast-moving go-kart has the potential to fling you out of the driver’s seat. Installing this correctly has been so misunderstood in the industry that the 2012 edition of the International Fuel Gas Code added a figure to show how it must be done.

10. Lack of combustion air

This is a big subject, with more to say than what follows. Combustion air does a few things: It ventilates the appliance, it provides oxygen for the fire, it feeds an open draft hood to maintain draft, and it replaces the air leaving the building with fresh outside air in order to maintain neutral pressure. In older homes, before the codes were loaded down with provisions for energy conservation, homes were leaky and interior-air calculations were done (or not done) to provide sufficient combustion air. A naturally leaky home will naturally allow replacement air (combustion air) to enter—this is one method allowed in the code. When the home was built, water heater installed, and combustion air designed, the water heater was likely in a wide-open unfinished basement. This offered a large volume of interior combustion air. With the air-sealing of homes and the finishing of basements— which often includes enclosing mechanical equipment in some sort of closet—interior combustion air gets choked off, and naturally drafting appliances get starved of air.

The above list is not a comprehensive discussion of all the code requirements for water heaters. But it does cover some of the most common mistakes— all of which are easily avoided if you know what to look for.

EDITOR’S NOTE:  One of our readers who lives in a region with regular seismic activity reminded us that strapping or other bracing is required for buildings that fit into one of the Seismic Design Categories specified in the IRC. If you live or work in one of these regions, chances are that your local codes have more specific details about requirements and best practices regarding water-heater bracing, so please check with your local building department.

More about water heaters

The Water-Heater Payoff – An expensive water heater may be efficient, but will it save enough energy to justify the purchase price?

Tankless Water Heaters – Tankless heaters don’t take up much room, and they don’t waste energy on hot water you’re not using.

Heat-Pump Water Heaters – Higher efficiencies than electric-resistance heaters will save money, but upfront costs are higher.

 Drawings: Kate Francis

From Fine Homebuilding #288

Please contact Texas Valor Inspection Services to schedule a professional inspection for your home or business: 833-898-2567 or email larry@texavalor.com

Going crazy during the lock-down and looking for a fun and educational family project? Plant a Victory Garden!

Victory.jpg

Stuck at home with the kids and going crazy sitting and waiting for the COVID-19 lockdown to pass? Angry that you can’t get the food items you are accustomed to from H-E-B? Worried that it feels like you are not controlling anything happening lately? Take local control with a Victory Garden!

Victory gardens, also called war gardens or food gardens for defense, were vegetable, fruit, and herb gardens planted at private residences and public parks in the United States, United Kingdom, Canada, Australia and Germany during World War I and World War II. In the war time governments encouraged people to plant victory gardens not only to supplement their rations but also to boost morale.

Planting a Victory Garden engages the whole family in an activity that

1.       Is outdoors (Yay!)

2 Is educational (Yes this counts as homeschool activity if you log it)

3.       Is fun

4.       Is inexpensive

5.       Gives you and your family control over a real local food supply

But wait, you say, I don’t know how to plant a garden!

Not to worry, I got you on this! Follow my guide below to make an EZ Victory Garden today. In this example I used a 6’ x 2’ x 2’ galvanized steel trough from Tractor Supply. You can scale it down by a third by using the 4’ x 2’ x 2’ steel trough if you like, just cut all the inventory by roughly a 1/3.

Project time

4 hours including shopping time

Project Inventory

From Tractor Supply

1 - 6’ x 2’ x 2’ galvanized steel trough                      $180
(Alternatively, the 4’ x 2’ x 2’ trough is currently on sale for $95)

1 – Bag Easy Straw Mulch                                             $15
(Optional)

From Home Depot

8 – 50 qt Magic-Gro potting soil                                $115
(Less expensive options available)

1 – Roll Weedblock Film                                                $13

1 – Miracle-Gro Garden Feeder                                  $12
(Optional)

Fruits & Veggies – Customize as you like here. We opted mostly for plants. The only seedlings we planted were lettuce and cabbage.

2 - Griller Zucchini 5”                                                      $8.76

1 – Big Bertha Bell Pepper 4.5”                                   $3.40

2 – Strawberry 4.5”                                                          $7.56

1 – Cantaloupe 5”                                                             $4.38

2 – Tomato 4”                                                                    $8.76

1 – Red Bell Pepper 4”                                                    $8.75

2 – Cucumber 4.5”                                                           $7.56

1 – Packet Cabbage Seeds                                            $1.59

1 – Packet Lettuce Seeds                                              $1.69

How to do it

1.       Select an area of your yard that gets a lot of direct sunlight.

2.       Place the trough in the desired location and cut in around the base with a spade, outlining the container.               

3.       Move the trough and dig out the lawn to create a pad, leveling the planter.

60693707587__D956ED7C-13BA-4DAE-9CBA-9A95A42DEB12.JPG

4.       Drill holes in the bottom of the trough to allow for drainage.

IMG_0828.jpg

5.       Cut the Weedblock Film to the dimensions of your trough 6’ x 2’ in our instance.

IMG_0830.jpg

6.       Place the trough on the prepared pad and put the Weedblock Film in the bottom.

IMG_0832.jpg

7.       Fill with potting soil, taking time to spread evenly as you go

IMG_0837.jpg

8.       Plan out your garden layout on paper or by setting plants on the planter.

9.       Plant your garden according to your plan. Ensure you left enough room between the plants!

IMG_0842.jpg

10.   Water the plants (We used Miracle-Gro plant food in our water).

IMG_0848.jpg

11.   Once the soil settles a bit, you can top it with the hay mulch which will ass additional nutrients and help keep the moisture in the soil.

12.   Watch it grow!

Educational topics I discussed with my son.

1.       The history of Victory Gardens.

2.       How to calculate volume using 3 dimensions and square footage using 2 dimensions (I explained the concepts of square feet and cubic feet using dimensions, then I had my son calculate the approximate volume and square footage of the planter).

3.       Soil science and crop rotation on large farms (This was a general discussion at a 4th grade level with some history of why we do it and what can happen if it is not managed properly).

Enjoy!

Larry Allhands

The 10 Most Common Defects Found in Home Inspections - And the Average Cost to Fix Them!

The process of buying a new home can be both exciting and nerve-wracking. While the initial stages of browsing through real estate listings, touring homes, and dreaming about your future can be fun, you’ll also want to make sure that you’re investing in a worthy piece of property. Especially considering that this will likely be the largest single investment you will make in your life. To ensure you aren’t buying into a ‘money pit’ of problems, it’s essential to have a thorough home inspection performed as a part of the home buying process.

To highlight this point, home inspections nation-wide have been uncovering much-needed property repairs. More than 1 million repairs needed more than $11,000 in costs, according to a February review of 50,000 home inspection reports by Repair Pricer, a home repair estimating resource.

Nearly 55 percent of homes analyzed across the country had doors that needed adjusting, which could be an indicator of foundation issues, the report showed. 54 percent of the homes lacked exterior caulking and sealant, which could leave the home susceptible to extensive water damage and higher energy bills. Furthermore, about 48 percent of homes lacked GFCI protection—this could pose a dangerous electrocution risk to homeowners around water-prone areas like the kitchen or bathroom.

“Homebuyers and real estate professionals across the country should leverage these insights to better position themselves in the stressful negotiation process,” says Christian Adams, CEO of Repair Pricer. “In places like Texas, for example, buyers may only be given three to five days to complete the inspection period, meaning they may only have 24 hours or less to make a decision. During this period, having clarity and insight into the cost of repairs listed in a home inspection report is critical to avoid leaving money on the table.”

The most expensive home defects—uncovered in 9 to 20 percent of the homes studied—ranged in repair prices from slightly more than $1,000 to less than $10,000.

The following is a chart from Repair Pricer of the 10 most common home defects found in inspection reports:

Report.png

When you consider that in Texas, a good home inspection conducted by a TREC licensed and certified Professional Real Estate Inspector will usually cost just 0.1 percent of the price of the home you are investing in, it makes sense to always have your property thoroughly inspected while in the option period to give you the peace of mind to make the buying decision and foresight needed for proper negotiation and safely closing of the deal.

Many low budget home inspection service companies use either TREC licensed Apprentice Inspectors or standard Real Estate Inspectors which have less stringent educational and experience requirements than the Professional Real Estate Inspector License. Texas Valor Inspection Services only uses TREC licensed Professional Real Estate Inspectors which are the highest qualified inspectors in the state.

Contact Us today to schedule your home inspection!